Ok I am at a loss. I am rebuilding the brake drums. The wheel cylinder is rebuilt, sandblasted and painted. I have new shoes, hose and spring. Everything has gone back together fine until I get to hooking up the brake spring. I bought a pair of brake return spring pliers but they just don't seem to be up to the task. It also may be the operator is not up to the task.
Is there a trick to getting that spring back on?
SpookyDad
How do I get the brake shoe return spring back on?
-
SpookyDad
- Captain

- Posts: 290
- Joined: Mon Jun 30, 2008 6:22 pm
- Location: Houston Texas
- Contact:
-
dr deuce
- Brigadier General

- Posts: 2400
- Joined: Thu Jun 08, 2006 1:10 am
- Location: Pembroke NH
- Contact:
OK,
1st you need to understand that some brake tools will not work. The hook on the end may be too small (weak) or too big.
2nd you need to understand that it pointy end will have to dig into the shoe material. The trick is to get it to dig in directly in line with the pull of the spring.
Once you get the spring started. try to have something to hold the spring from popping back out as you carefully unhook the pointy end from the shoe material and twist the tool to unhook it from the spring.
MAKE SURE YOU PUSH THE SPRING ALL THE WAY INTO THE HOLE IN THE SHOE. WHERE YOU LEAVE IT WHEN YOU REMOVE THE TOOL IS NOT ALL THE WAY IN.
Dr Deuce Over 50,000 driven miles in a CCKW
1942 CCKW closed cab shopvan
1943 CCKW closed cab cargo w/M32 MG mount
1944 CCKW open cab LeRoi Kompressor
1944 CCKW open cab F1 Aircraft fueler tanker
1945 CCKW open cab cargo w/artic cab
1942 Chev cargo
1942 Chev K51 Panel
1944 Chev M6 Bomb Truck
1942 GPW Jeep
http://home.comcast.net/~cckw/wsb/html/ ... 59870.html
-
Cat Man

- Major

- Posts: 420
- Joined: Thu Jul 20, 2006 9:55 pm
- Location: Green Bay WI
Brake Spring
Neil,
If you have the correct brake spring plier, Dr. D is correct.
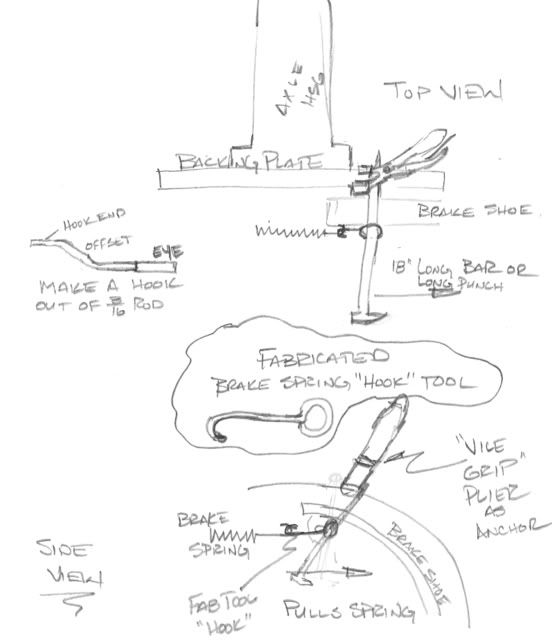
Here is another option. We have fabricated a small tool from a piece of 3/16 rod in the shape of a sort of "fish hook" about 4 inches long. I'd show a photo except mine is on loan (again) for another collector.
A small "C" clamp or small "Vice Grip" pliers on the backing plate forms an anchor post to pry against. Use a long puch or roll head pry bar thru the "eye" of the fabricated hook tool to pull the brake spring over the anchor hole and then push the brake spring hook end into the anchor hole and release the pry bar. The fabricated tool can then be "unhooked" from the brake spring.
I've used them for years and have fabricated them for friends. Looks crude but it actually is a pretty neat little tool.
Here is a rough sketch (apoligies to my 11th grade drafting teacher)
Cat Man
If you have the correct brake spring plier, Dr. D is correct.
Here is another option. We have fabricated a small tool from a piece of 3/16 rod in the shape of a sort of "fish hook" about 4 inches long. I'd show a photo except mine is on loan (again) for another collector.
A small "C" clamp or small "Vice Grip" pliers on the backing plate forms an anchor post to pry against. Use a long puch or roll head pry bar thru the "eye" of the fabricated hook tool to pull the brake spring over the anchor hole and then push the brake spring hook end into the anchor hole and release the pry bar. The fabricated tool can then be "unhooked" from the brake spring.
I've used them for years and have fabricated them for friends. Looks crude but it actually is a pretty neat little tool.
Here is a rough sketch (apoligies to my 11th grade drafting teacher)
Cat Man
40 Years An Engine Guy
30 Years A Caterpillar Guy
Still Learning Every Day
30 Years A Caterpillar Guy
Still Learning Every Day
-
SpookyDad
- Captain
- Posts: 290
- Joined: Mon Jun 30, 2008 6:22 pm
- Location: Houston Texas
- Contact:
Cat Man
Did you produce that drawing in AutoCAD?
I am pretty sure I know what you are describing. I used to do some blacksmithing so a little tool like that should be no problem. I will have a go at making one in the morning.
Thanks for the advice.
Dr. Deuce, I will try your method second, as I don't think the brake spring pliers I have are for these sized drums.
Neil
-
Chris_M

- Captain
- Posts: 203
- Joined: Fri Sep 14, 2007 10:55 am
- Location: Near Nuremberg, Germany
- Contact:
I had the same problem last year. But after some trying I found a way to do this even without the help of another person or special tools. All you need is a ordinary clamp, a large flat head screwdriver and a hammer. First press the cylinder caps all together with the clamp. Make sure you have the shortest distance for the return springs endings to snap in. Hang one end of the spring in the hole at the brake shoe. Now place the screw drivers flat end under the other hook. Push with strong force towards the other brakes shoes hole until the hook snaps in. It will not snap in completely as your screw driver blade is still underneath. remove the screwdriver. The spring hook has enough place to remain at the hole. Now take the hammer and make the hook snap in completely. That's it. It worked very well this way. 
Regards,
Chris
Regards,
Chris
45 CCKW 353 2
-
dr deuce
- Brigadier General
- Posts: 2400
- Joined: Thu Jun 08, 2006 1:10 am
- Location: Pembroke NH
- Contact:
With any of these measures, there is a LOT of tension on the spring, so BE CAREFUL!!!!!!!!!!!!!!!!
Dr Deuce Over 50,000 driven miles in a CCKW
1942 CCKW closed cab shopvan
1943 CCKW closed cab cargo w/M32 MG mount
1944 CCKW open cab LeRoi Kompressor
1944 CCKW open cab F1 Aircraft fueler tanker
1945 CCKW open cab cargo w/artic cab
1942 Chev cargo
1942 Chev K51 Panel
1944 Chev M6 Bomb Truck
1942 GPW Jeep
http://home.comcast.net/~cckw/wsb/html/ ... 59870.html
1942 CCKW closed cab shopvan
1943 CCKW closed cab cargo w/M32 MG mount
1944 CCKW open cab LeRoi Kompressor
1944 CCKW open cab F1 Aircraft fueler tanker
1945 CCKW open cab cargo w/artic cab
1942 Chev cargo
1942 Chev K51 Panel
1944 Chev M6 Bomb Truck
1942 GPW Jeep
http://home.comcast.net/~cckw/wsb/html/ ... 59870.html
-
awg
- First Lieutenant

- Posts: 118
- Joined: Thu Oct 05, 2006 12:33 am
- Location: Newcastle, NSW, Australia
when I did it, I just used 2 large screwdrivers. ( or files)
one wedged into the backing plate
the other into the spring end
lever one against the other to stretch the spring.
this is the simplest method i could devise and worked very easily.
I had no problems at all and it took a few seconds.
I did all wheels, so I know it works
I do endorse Dr D, in that a lot of force is needed.
If there is any "slip off" could be dangerous.
wear protective gloves, eye/face cover, and long thick trousers
CCKW 353 w/winch
-
robc
- First Lieutenant
- Posts: 107
- Joined: Thu Jun 08, 2006 1:10 am
- Location: U.K.
I have just been overhauling brake cylinders on the rear axles of my CCKW, split axles with demountable drums, the way I removed and fitted return springs was as follows:
Out of a small piece of angle iron approx approx size 1/2" x 1/2" x 18".
Cut off approx 3/4" from one end leaving a flat part, tapered down by grinding, using small round file, filed 'C' in flat, this lets spring locate here.
By knocking flat part between return spring and brake shoe then using hub as a pivot point by pulling angle, this easily removes brake spring.
Fitting spring is reverse procedure, you can hold shoes in place by wrapping round masking tape.
Will try and take pictures and post on forum.
Robc.
CCKW 352-399807-B1. No 7 Set Fitted.
CCKW 353-359616-1. Shopvan. ST5.
Dodge WC53 Carryall 81577831(Sold)
Gemco 1/4 Trailer 1879.
CCKW Cab (only) under restoration.
CCKW 353-359616-1. Shopvan. ST5.
Dodge WC53 Carryall 81577831(Sold)
Gemco 1/4 Trailer 1879.
CCKW Cab (only) under restoration.
-
SpookyDad
- Captain
- Posts: 290
- Joined: Mon Jun 30, 2008 6:22 pm
- Location: Houston Texas
- Contact: